
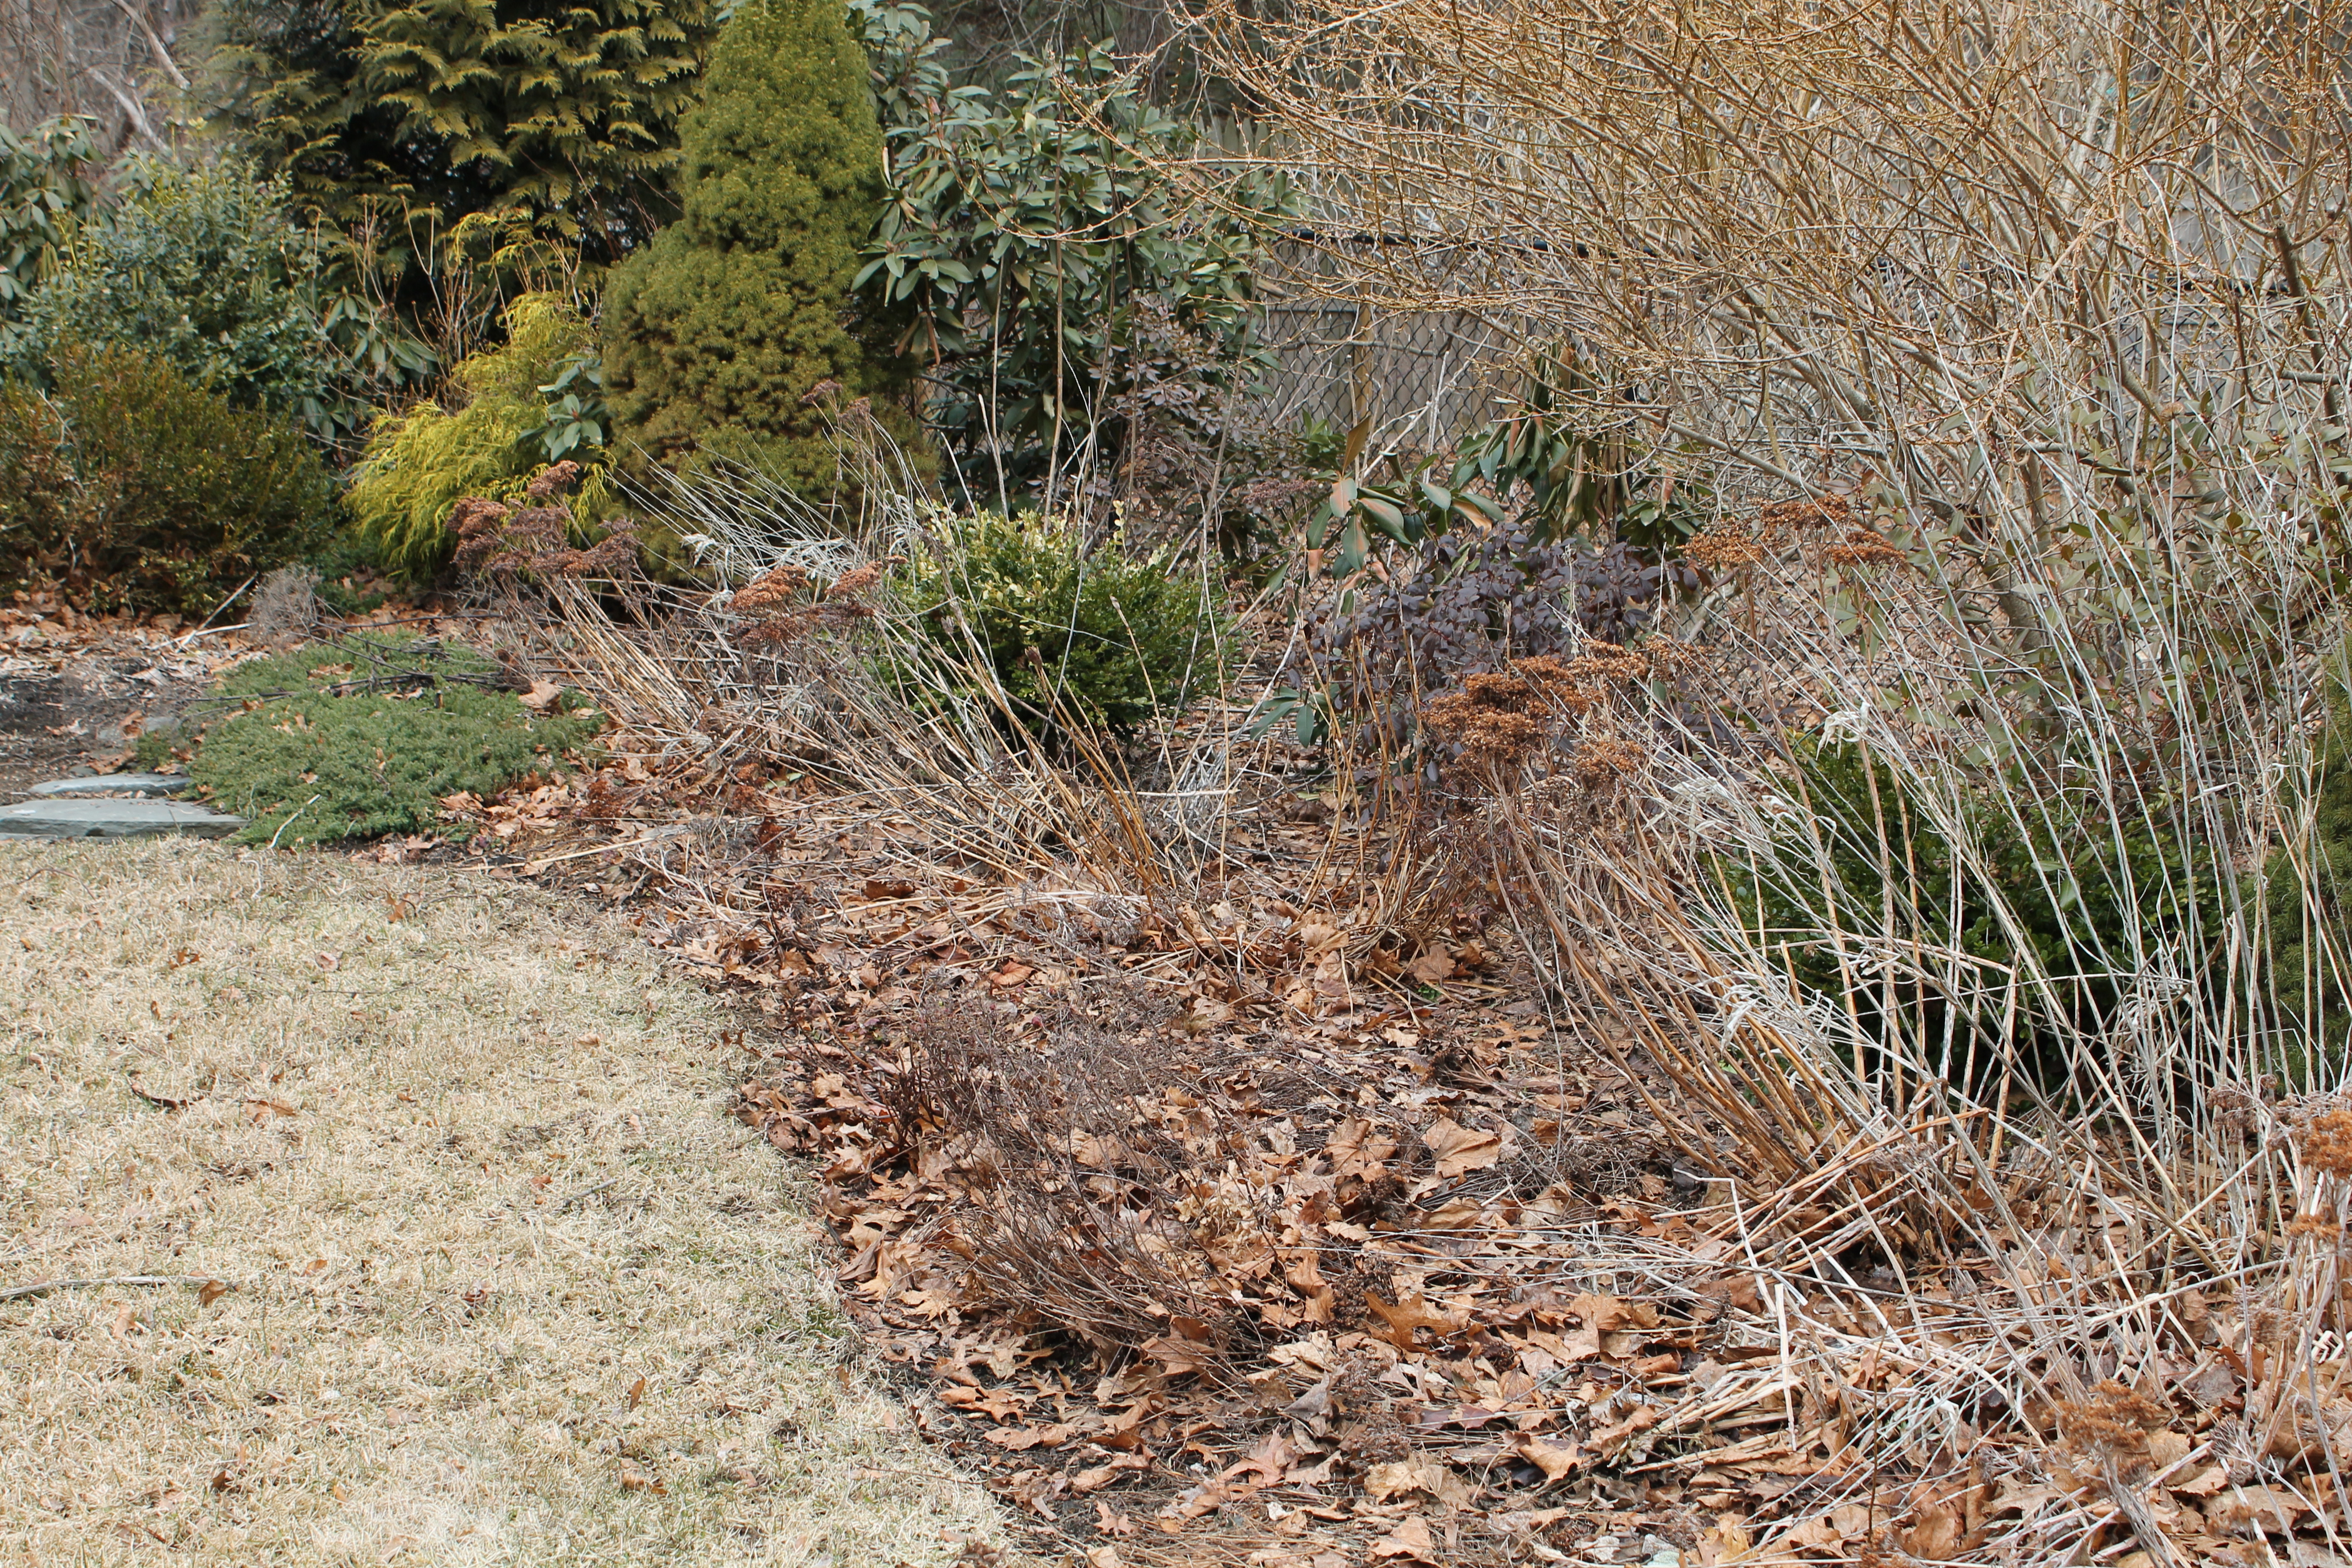
Most gardens look their worst just before spring cleanup.
It’s that time of the year when we start poking our heads out of our houses and take a first look at our gardens. Let’s face it, most gardens don’t look their best in March. The winter has likely taken a toll on some of your plantings. Maybe you had a visit from some deer? Surely there are leaves and branches where they don’t belong and generally things look dull and brown. But if you look close, you can see the early signs of spring coming.
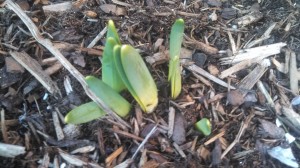
Daffodils- a sure sign of spring
Daffodils and Tulips are pushing up and some other bulbs may actually be blooming (like Snowdrops). If you’re lucky enough to have some winter blooming witch hazel, then your spring bloom has already begun (read more about winter blooming witch hazel here).
Seeing those first signs of spring is what gives us the energy for the spring cleanup, so feel free to roam around and check for new growth. Perennials like daylilies, sedum and catmint will have new growth visible long before others. Hostas are notorious for popping up late, so don’t be discouraged if you don’t see those new hosta spikes yet!
Everyone has their own style for spring cleanups, and you will probably develop your own once you get the hang of it. Even if you plan on hiring professionals to do this for you, it will help you to make informed decisions if you understand the process. We’ll start from the beginning and give you a good overview of the essential spring cleanup. We’ll also give you some background along the way on how gardens work. So, let’s dive right in…….
First, get your hands on some good clippers and a rake. Wire rakes work better than plastic leaf rakes, but either will do. If you have a leaf blower, even better. Take your tools out to the garden and have a look around. Go ahead and remove any fallen branches from the garden and take a general assessment. Don’t get discouraged about how bad things look. No matter how many years you garden, things will always seem like a lost cause in March. Take heart, by mid-April, you won’t remember what you were worried about.
Next, pick a starting point and start cutting down any perennials from last season. If you’ve cut down your garden the previous fall, then you’ll have less to do here. For perennials that fall completely to the ground over the winter (like daylilies, hosta, Siberian
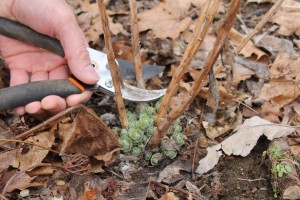
Cut an inch or two above new growth
iris) remove all traces of last year’s plant. For perennials that leave dead vertical branches (black-eyed Susans, coneflowers, garden phlox), cut the branches down to just an inch or two above the ground. Leaving an inch or two of the old branches acts as a reminder that something is there, so no one steps on precious garden plants or mistakes them for an empty spot. Some perennials also put out new growth from the bottom part of old branches, so it’s best not to cut completely to the ground.
As you cut your perennials, check for new growth near the base of your plants. Make sure you don’t cut off any new shoots. When in doubt, it’s better to cut less instead of more. We are only cutting for aesthetic reasons, so it won’t hurt to leave uncut branches.
Do You Need to Cut Down Your Garden Every Year?
Cutting down old perennials is really optional. It’s not necessary for the survival of your garden plants at all. Gardeners typically cut down the previous year’s remains for aesthetic reasons. The old stems will eventually decay and disappear on their own, but it is not pretty to see all that dead matter in the garden for the first half of the season. This is why most gardeners cut down their perennials every year.
Once you’ve cut down your perennials, the garden will look a whole lot better. Now it’s time to start removing leaves and cuttings from the garden. This is where it gets a little complicated. There are lots (and lots) of opinions on this subject and many different ways of dealing with leaves in the garden. First and foremost, if you want to keep it simple, you can just rake out and remove all the leaves and cuttings from your garden beds.
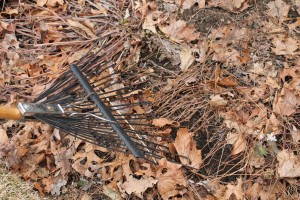
Use a wire rake to gently remove leaves from the garden bed
This will make them look neat and tidy and all will be well. You will then have to mulch your garden after you’ve raked it out (we’ll talk more about mulching in another post). However, there are alternatives to simply removing all the leaves from your garden. At some point, you should understand the options and make a conscious choice about how you are going to manage your garden. This will affect how you do your spring cleanup each year.
To make an informed decision, there are a few things you will need to understand. We’re going to go off on a bit of a tangent here to teach you a little about how your garden works. Don’t worry, we won’t get too scientific. We just want you to be able to feel confident about managing your own garden.
The Landscaper Mulch and Leaf Trap
Have you ever seen those armies of landscapers that descend on the “nicely landscaped” homes of suburbia in the fall? Heavily armed with leaf blowers, they neatly strip out every last leaf and twig from the lawn and garden beds. When spring comes, they return again to lay mulch in the bare garden beds that they “cleaned” in the fall. This is all well and good and these yards look very neat and manicured all year long. This type of maintenance can be expensive and it’s what most of us think of when we think of a “well maintained” garden. But to me, this is just another example of how we’ve lost touch with the basics of gardening. Let’s look a little deeper and see what’s really going on here.
The Natural Cycle of Your Garden
So, we all probably understand the basics of what happens in a natural forest or meadow over the course of a year. In the spring, plants grow, trees make new leaves and flowers bloom. By fall, those same leaves are falling to the forest floor and wildflowers are dying back to the ground. These leaves and dead flower stalks produce a natural mulch for themselves. This mulch decomposes over time and adds nutrients back to the soil. It’s really pretty amazing. Nature is self-fertilizing and self-mulching! So, now think about your garden. The same thing is trying to happen. You’ve got all this natural mulch and compost being added to your garden and most of us actually pay someone to remove it each year! Then we pay them to come back and add manufactured mulch. It all sounds a little crazy when you think about it. Well, before you go and fire your landscaper, there are some benefits to cleaning up your garden each year.
Unlike the forest floor, your garden probably has a wide variety of plants, some of which do not like being smothered under layers of fallen leaves. Also, let’s face it, fallen leaves aren’t the most attractive addition to your garden. So, most of us, even when we understand this natural cycle, still participate (to some extent) in the cleanup and mulch trap.

This garden was designed to use the natural fallen leaves as mulch. Each year, the fallen leaves are left and it’s not necessary to buy mulch.
It all comes down to the way your garden is designed. It is entirely possible to design a garden that looks great and functions well even with a covering of fallen leaves on the ground. A garden like this would have shrubs and tough perennials that can easily push up through a layer of leaves. This is a subject for another day, but, keep it in mind if you ever get tired of the yearly cycle and just want a garden that is more natural and requires less maintenance. The mulch and leaf trap can be avoided with some planning.
Okay, so, now you know a little about how a garden works. Leaves and other decomposing materials can actually give gardens nutrients and act as a natural mulch. But, fallen leaves can also smother some perennials and can make a garden look messy and unattractive.
Some Alternatives to the Mulch and Leaf Trap
Some experienced gardeners that are trying to stay closer to the natural cycle will strategically use fallen leaves to mulch and add compost to the garden. There are several ways to do this. The first, (as we mentioned earlier) is to design the garden, so it can stand up to a layer of leaves each year and still look good. (We’ll cover the details of this in another post). Another method is to clean out the garden completely, save the leaves and compost them. You can then use the composted leaves from previous years to mulch the garden. Some gardeners rake out the garden and mulch up the leaves and cuttings by running them over with a lawn mower. They then put the newly made mulch back into the garden being careful not to smother smaller perennials. If you have a typical garden that has smaller perennials in the front and larger perennials and shrubs in the back, you can just remove the leaves from the front part and put them in between the shrubs in the back of the garden. This will reduce the amount of mulch you will have to buy and the leaves will go unseen in the back of the garden.
One last word on removal of leaves and cuttings in the garden. Any plants that have been damaged by disease should have all their cuttings removed from the garden. Leaving cuttings from diseased plants in the garden can cause diseases to spread.
Now that you understand the benefits and dangers of leaves and cuttings in the garden, you can make your own decision about how you want to manage your annual cleanup. Most beginners start by doing the typical cleanup process. Remove everything and then buy mulch. This is fine. As you gain experience over the years and feel more confident, you can go ahead and try some of the more natural (and inexpensive) alternatives.
Now let’s get back to our cleanup process….
Removing Leaves and Cuttings from the Garden
If you are not using leaves to mulch your garden, you will need to remove them along with any of the remaining cuttings from your perennials. Use your wire rake to gently pull out the leaves from between plants. Be careful, some perennials can be pulled up if you are too rough with the rake. A leaf blower may be helpful ,but you will probably still need to get at some areas with a wire rake even if you have a leaf blower. Some areas will require you to use your hands to remove leaves. Don’t worry about removing every single leaf from the garden. A few leaves (as we have learned) may actually be good for your garden. Just pay attention to the look of the garden. Any leaves that will stay hidden, or can be mulched over can stay behind. Just make sure no perennials are buried under layers of leaves. Also, make sure to remove leaves that get caught in the branching of shrubs. These can really look unsightly in the garden.
Once you have cleaned out your garden, you will have to mulch it. Mulch provides many benefits to your garden including weed prevention, moisture retention and improving the look of your garden. Our next post will give all the information you need to choose and lay mulch in your garden. Before you leave this topic, let’s do a quick rundown of the important steps of garden cleanup:
1) Get a wire rake and a good pair of clippers (and a leaf blower if you have one)
2) Remove any fallen branches or other debris from your garden.
3) Cut down all dead stalks of perennials leaving an inch or two to mark the spot where possible. Be careful to cut above any new growth.
4) Decide on your garden clean up method. Will you be using your fallen leaves as a natural mulch or will you be removing them?
5) Remove all leaves from around perennials so they can grow freely.
6) Remove as many leaves as possible from the garden if you will be using another material for mulch. If you’ve decided to use your leaves for mulching, make sure (again!) leaves are cleared away from perennials.
7) Don’t worry about getting every single leaf. Just make sure the garden looks good and check yet again that there are no leaves smothering perennials.
8) Remove fallen leaves from the branches of shrubs.
9) You are ready to mulch!